Here, we’re going to show you how to install the Windows 8 Developer Preview. But before you do
that you should prepare a USB stick with Windows 8 ready to go. With the help of a program called Windows 7 USB/DVD Download Tool – on this issue’s cover disc – you can create a fast installation of Windows 8 on a simple USB memory stick, so if you want to install onto a tablet or netbook PC
without a DVD drive, you
can. This enables you to get a preview
of the latest operating system all in
one quick and easy step. What you
need is around 10GB of free hard drive
space on your computer and a USB
stick with a minimum of 4GB free.
Windows 8 Developer Preview is free
to download and try from Microsoft.


 Now you’ll need to plug your USB memory
stick into your PC, unless you’ve already done so.
Once inserted, click on the drop-down menu and
choose your USB device from the list. If you don’t
have enough space on it you’ll be asked to clear the
contents of the device to free up room.
 Once the the Download Tool has finished preparing the
USB memory stick, the green progress bar will be at 100 per
cent and it will tell you that a bootable USB device has been
successfully created. If you’re happy with that, simply click on
the cross in the top right-hand of the app window to close it.

Add Me To Your Google+ Circles
that you should prepare a USB stick with Windows 8 ready to go. With the help of a program called Windows 7 USB/DVD Download Tool – on this issue’s cover disc – you can create a fast installation of Windows 8 on a simple USB memory stick, so if you want to install onto a tablet or netbook PC
without a DVD drive, you
can. This enables you to get a preview
of the latest operating system all in
one quick and easy step. What you
need is around 10GB of free hard drive
space on your computer and a USB
stick with a minimum of 4GB free.
Windows 8 Developer Preview is free
to download and try from Microsoft.
1.Download Windows 8
Before you create your own Windows installation, you
need to download the Windows 8 Developer Preview from
http://bit.ly/r8eqO3. This is an ISO image file, which you can
save to your hard drive somewhere – make sure it’s a place you
can easily access as you’ll need it again in a minute.
need to download the Windows 8 Developer Preview from
http://bit.ly/r8eqO3. This is an ISO image file, which you can
save to your hard drive somewhere – make sure it’s a place you
can easily access as you’ll need it again in a minute.
2.Install the tool

Now you can install Windows 7 USB/DVD Download Tool
from your free disc – just follow the simple installation steps. To
find the Download Tool, click Start and browse to All programs
➜ Windows 7 USB/DVD Download Tool and click on Windows 7
USB/DVD Download Tool.
from your free disc – just follow the simple installation steps. To
find the Download Tool, click Start and browse to All programs
➜ Windows 7 USB/DVD Download Tool and click on Windows 7
USB/DVD Download Tool.
3. Find the Install file

Once the application has opened, click on the
Browse button to the right so you can find the ISO
file you just downloaded from the Microsoft
website. Once you’ve located it, select the ISO file
and then click on the Open button to get it ready
to be converted into a USB install disk.
Browse button to the right so you can find the ISO
file you just downloaded from the Microsoft
website. Once you’ve located it, select the ISO file
and then click on the Open button to get it ready
to be converted into a USB install disk.
4.Choose your media

In the next step you’ll be asked whether you
want to install the Windows 8 Developer Preview
from a USB stick or a DVD. We want to install it on a
USB disk, so click on USB device. If you change your
mind at any point you can click on Start over to go
back to the beginning.
6
want to install the Windows 8 Developer Preview
from a USB stick or a DVD. We want to install it on a
USB disk, so click on USB device. If you change your
mind at any point you can click on Start over to go
back to the beginning.
6

5. Find a USB stick
 Now you’ll need to plug your USB memory
stick into your PC, unless you’ve already done so.
Once inserted, click on the drop-down menu and
choose your USB device from the list. If you don’t
have enough space on it you’ll be asked to clear the
contents of the device to free up room.
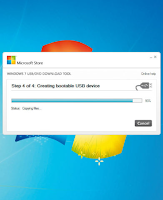
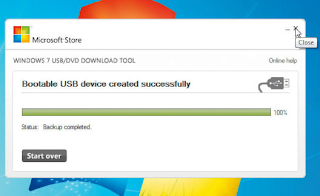
7. Leave it to get on with it
 Once the the Download Tool has finished preparing the
USB memory stick, the green progress bar will be at 100 per
cent and it will tell you that a bootable USB device has been
successfully created. If you’re happy with that, simply click on
the cross in the top right-hand of the app window to close it.
8. Create your installation

Congratulations, you’ve now created your USB install device
and you are ready to reinstall Windows 8. You’ll notice that when
you go to Computer, the USB stick will be displayed as ‘Windows
install’. When you’re ready to install Windows 8 onto your PC, go
and read our guide on page 76.
and you are ready to reinstall Windows 8. You’ll notice that when
you go to Computer, the USB stick will be displayed as ‘Windows
install’. When you’re ready to install Windows 8 onto your PC, go
and read our guide on page 76.
Google Link :Source


0 comments
Posts a comment